
 A common mistake I see users of QuickBooks make is how debt or loans are recorded in QuickBooks and how payments are made to that debt. This article will assist QuickBooks users in correctly recording both the original transaction that generated the loan and new asset, as well as recording the loan payments subsequent to the purchase date.
Recording Original Debt
Debt is recorded on the balance sheet at the principal value. This amount should be recorded as of the day the loan was originated or the beginning of the fiscal year if the debt was originated before QuickBooks was set up. To illustrate, let’s say the company purchased a manufacturing press at a total equipment cost $120,000. They paid $20,000 in cash and borrowed $100,000. Follow these steps to properly record the debt and the equipment purchase:
1. Begin by setting up the liability.
The liability is set up by adding an account to the Chart of Accounts. Find the new account dialog box by clicking on the “Lists” command at the top of the screen and selecting “Chart of Accounts”. At the bottom right hand corner of the Chart of Accounts window is a bottom labeled “Account”. Click on this and select “New”. You should have a window that looks like this:
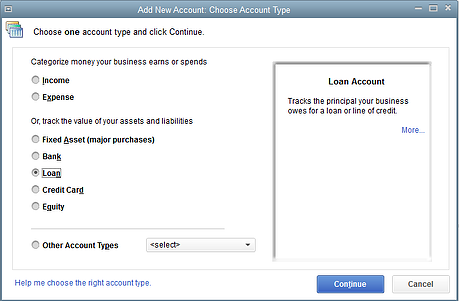
Select the “Loan” radio button and press "Continue". You should get a window that looks like this:
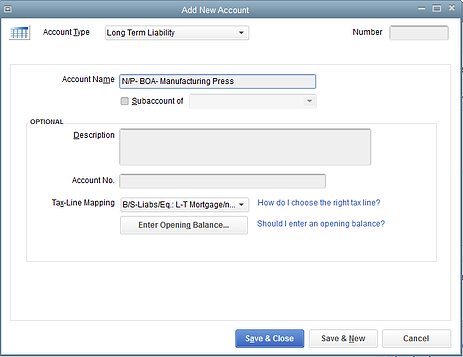
A. In the Account Type box, change the account type to “Long Term Liability” if the note is going to extend beyond twelve months.
B. Title the loan in the Account Name Box. If the loan was through Bank of America, a fitting name for the note payable in this example would be “N/P-BOA- Manufacturing Press Loan”.
C. Click on the “Enter Opening Balance” button and enter the amount of the loan- in this example $100,000 and the date the loan originated. Click “OK” and then “Save & Close” in the next dialog box.
2. Now set up the portion of the asset that the loan purchased.
Begin by follow the same steps as we did when setting up the liability: Company (at the top of the screen)> Chart of Accounts > Account (at the bottom left corner) > New. Now select the “Fixed Asset” radio button, press continue, and name the account in the “Account Name” box. In our example, we could post to a general account “Machinery and Equipment”. The Account type at the top should be “Fixed Asset”. Change it to “Fixed Asset” if it did not auto-fill. Click on “Enter Opening Balance” and enter the amount of asset that is attributed to the loan- in this example $100,000. Click “OK” and then “Save & Close” in the next dialog box.
3. The last step is to record the cash payment if that is applicable to your case.
In our example, we paid $20,000 cash, so we will write a check through the normal check writing interface. Click on “Write Checks” in the Banking section on the home page and write the check to the appropriate vendor with the correct amount. The next step is important. In the account section under the check facsimile, click the drop down button (the little down arrow), scroll up and select the same asset we set up in step two (in our example it was “Machinery and Equipment”). Click “Save & Close”.
We now have the Asset listed at full purchase price and the Liability at full principal value. For users of QuickBooks that prefer general journal entries, the entry for our example would be as follows:
| ACCOUNT | DEBIT | CREDIT |
| Machinery and Equipment | 120,000 | |
| N/P-BOA- Manufacturing Press | 100,000 | |
| Cash | 20,000 |
A user that prefers journal entries will still need to set up the new accounts as prompted in the entry process.
A quick check to verify if everything has been correctly entered would be to run a balance sheet report. There will be a new asset listed in the fixed asset section at the full purchase price, a long term liability listing principle value and a cash balance that has decreased accordingly.
Recording Loan Payments
Debt payments consist of two components: principal and interest. Most if not all loan statements will list out the principle portion and the interest component of every payment. Correctly performing this step is simple if followed carefully.
1. Open the “Write Check” interface in the Banking section, just like you would to write or record any check. Fill out the check to the appropriate bank or lending institution.
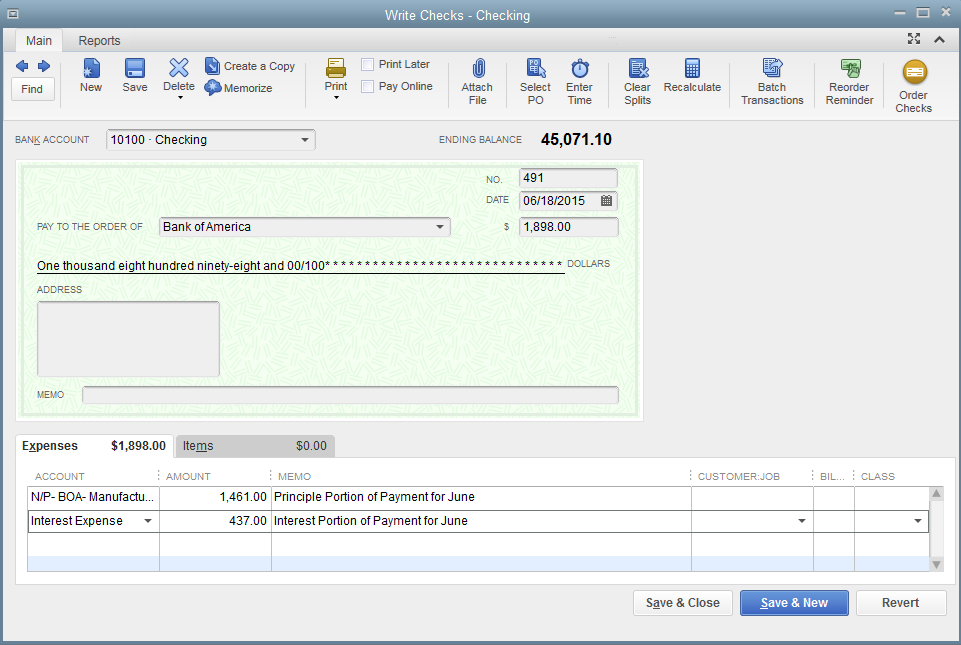
2. In the account section, you will need to split the payment between the principal and the interest. In the first line, click the drop down command (little down arrow) and select the loan that we set up in step 1 above. In the amount column, enter only the principle portion of the loan payment.
3. On the second line, select the “Interest Expense” account in the account column and enter the interest portion of the payment in the amount column. (See below for an example.) As stated above, the principle portion and the interest portion are likely listed on the loan statement. If not, contact your accountant for an amortization schedule.
4. Click “Save & Close” and print the check or pay as applicable.
Using our example, a QuickBooks user that prefers general journal entries can record the payment in the following manner:
| ACCOUNT | DEBIT | CREDIT |
| N/P- BOA- Manufacturing Press Loan | 1,461 | |
| Interest Expense | 437 | |
| Cash | 1,898 |
Correctly recording the loan and loan payments will allow the Balance Sheet to properly display the remaining loan balance and the Income Statement to record the amount of interest expense. This will assist in better management decisions and will reduce the time and expense associated with year-end accounting work.
If you have any questions about posting loan or other transactions in QuickBooks Software, please feel free to contact one of our CPAs at (616) 642-9467 or request a complimentary accounting consultation.

